
The reason why we all love Excel is because we have a lot of flexibility in formatting and manipulating data the way we want. Very often we are restricted by the systems we use in terms of how we can see and present our data. And this is why we export reports into Excel files and we can format data to the way we need them to be. For example we may need to separate a list of clients’ full names into first names and last names or we need to split a list of invoice numbers. In this article, we will explore different situations, various data types and different methods to split texts in cells.
Text to Columns
Text to Columns, as the name suggests, splits text in a cell (or a range of cells) into multiple adjacent columns.

With Text to Columns, there are two options available:

- Delimited: we can pick a particular character (symbol, letter or number) and every time Excel sees that character in the cell, it will split to the rest of the text into the next column. This could be useful with splitting full names into first names and last names by setting a space as the delimiter.
- Fixed Width: we can split texts by setting break lines anywhere. E.g. we can choose to split texts at the fifth character in a cell. And we can create as many break lines as we want. So e.g. we can split texts at the fifth character, the seventh character and then the twentieth character. And as you can imagine, if we want to split full names into first names and last names, this would not be very useful because different names would have different numbers of characters.
Tip: the purpose of Text to Columns is to split text across to adjacent cells. You will need to make sure the adjacent cells are empty otherwise you will get error message below: |
Delimited
With Text to Columns – Delimited, we can choose a character – any character we want (symbol, letter or number) and every time that character appears in the cell, Excel will split the text into another column. Here’s an example below:
In our CRM, there’s a field which has checkboxes that allow more than one selection. And when we export the data into Excel, it’s formatted as below:

The data is rather messy. For entries that have multiple selections, they are all entered into one cell. This makes it very hard to do any analysis.
But we can also see that each selection is separated by a semi-colon (;). That means we can use Text to Columns – Delimited to separate each selection:
- Highlight Column A
- Select the Data tab at the top and click Text to Columns

- Select Delimited and click Next
- Select Semicolon
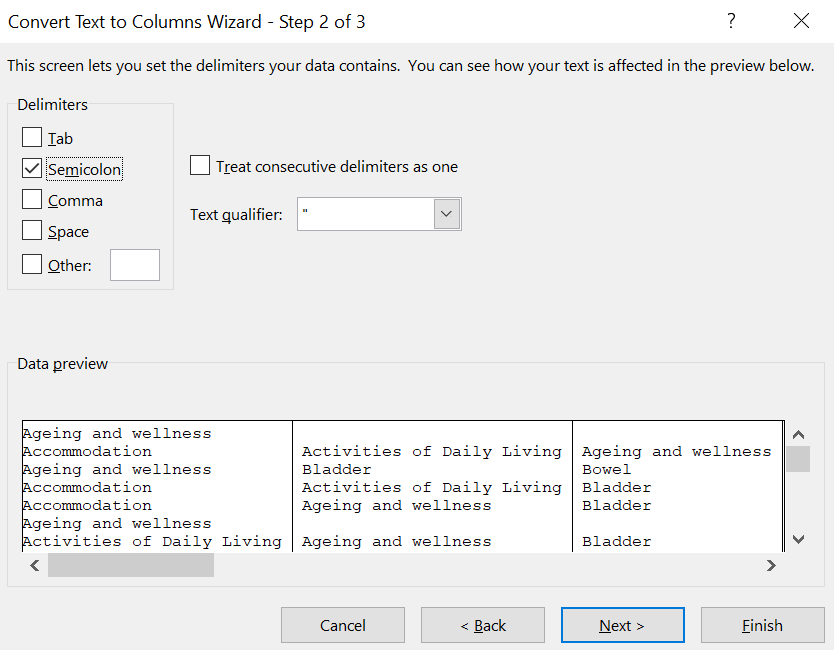
Note that here we could select “Other” and enter any character we want in the box next to it. The only limitation here is that although we can select multiple delimiters listed, only one character can be entered in the “Other” box. - Click Next
- Click Finish
And this will be the end result: 
It is now much easier to analyse the data e.g. using COUNTA or COUNTIFS.
Here’s another example. When we copy and paste a table from PDFs to Excel, the format does not always transfer across the way we want it to:

Of course we could use Power Query instead (see more here on Power Query) to export PDFs into Excel but we could also use Text to Columns with space as the delimiter. The result will not be 100% perfect (we will need to shift the headings a bit) but it will again be a lot easier to work with the data:

With some copying and pasting, it will only take a minute or two before we can format it to a proper table:
Fixed Width
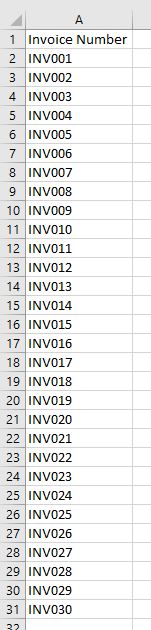
Text to Columns – Fixed Width gives us the choice to create break lines wherever we want – and as many as we want. Let’s take a look at the data below as an example. It is a list of invoice numbers and let’s say in this case, we want to separate “INV” and the invoice numbers:
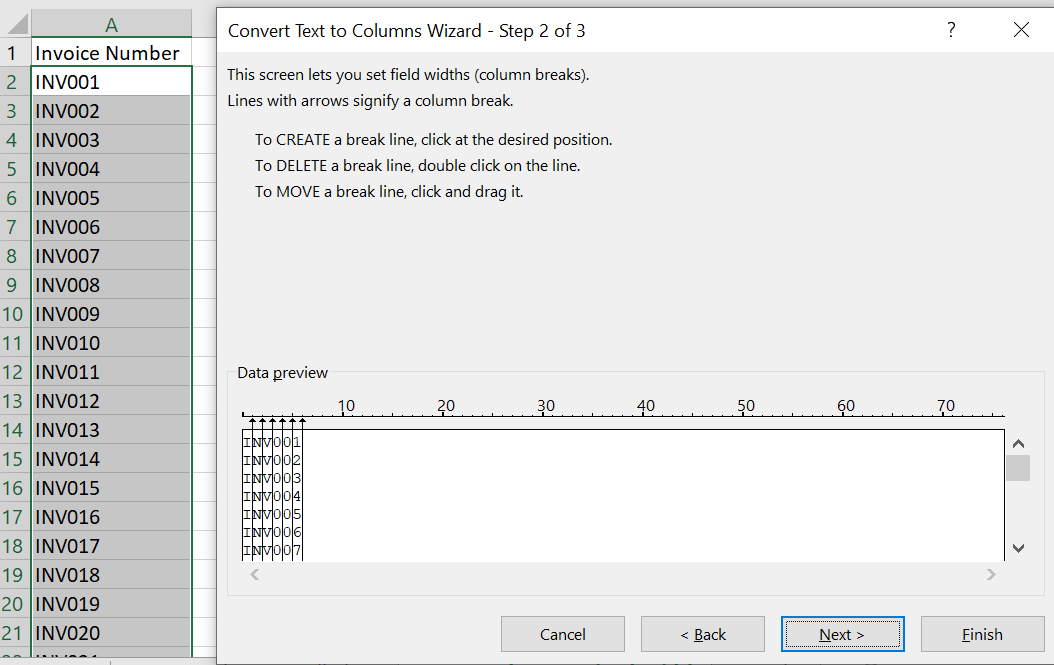
In this case, Text to Columns – Delimited will not be very useful because there is nothing between “INV” and the invoice number. We could potentially use “V” as the delimiter. But you can see above in Delimiter section, when we use semicolon (;) as the delimiter, the semicolon disappears after the texts are split. This means if we use “V” as the delimiter, the end result will be “IN” and invoice number – “V” will disappear.
The best way will be to use Text to Columns – Fixed Width:

The line in between “INV” and the invoice number is the break line. And it can be inserted anywhere. In fact, we can insert more than one. We can insert as many break lines as we want. For example:
And in this case, each character (“I”, “N”, “V”, “0”…) will be split into a separate cell
But back to the example above, if we insert one break line between “INV” and the invoice number and we click “Finish”, we will get the following:

In summary, there are pros and cons with using Delimited and Fixed Width. Which one you use depends on the data you currently have and how you want to split the text.
| As a final tip: we can see in the example above with Fixed Width, in using Text to Columns, we don’t necessarily have to select the whole column. Many reports we extract from systems have headings and we don’t want to split the headings. We can select the range of cells we want to split and apply Text to Columns only to those cells. |
If there’s anything else you would like us to add into this article, please leave a comment below! We would like to keep improving the content in our articles.
0 Comments Leave a comment